It takes A Lot Of Grit To Smooth Things Out – Chester Yawl Part 5

Typically it takes a week or so to get one of these Chester Yawl chapters posted. This one’s taken longer than I wanted to show up. My life does not allow time or energy for steady writing but that gives an opportunity to marinate each experience in grey matter. Stirring the rich stew that results requires a search for spice that is challenging to say the least. I could try to say the least about sanding epoxy but you might become as bored as I was with a sanding block in one hand staring down fifteen feet of planking that looked like fossilized cheesecloth.

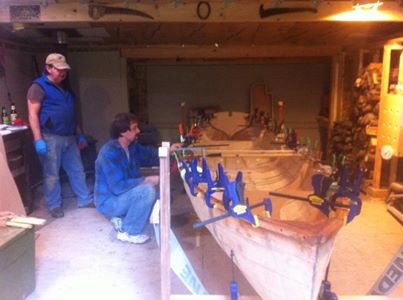
The latest foray to the boat shed began with a sort of coin-toss choice. Things needing to be done were: sealing the gunwale rails or sanding the skeg and bottom planks followed by some epoxy sealing of the topsides planks. We went for the bottom job for no particular reason other than the job just had to get done. Dave and Bob had laid the fiberglass cloth on the bottom-most planks some time before. This left a bottom that was not entirely flat. There were places with overlaps at the beginning of a new length of cloth. there was a transition where the bottom cloth met the fabric going up the sides of the skeg. These seams needed to be faired in preparation for painting.  In typical fashion what was first applied must be altered or hidden for a final effect. After all boatbuilding has a good bit of illusion involved.

The job would be easier if this were a flat bottomed skiff. The job was complicated by the plank laps. They create restricted areas requiring smaller sanding blocks and short strokes. All our sanding was being done by hand. Using an orbital sander, carefully so as not to expose the weave of the cloth, would be faster but the plank widths prevented that.  Epoxy is hard stubborn stuff. The most effective tool in dealing with it is simple determination. The ability to grit your teeth and put your mind in low gear for a steady pull is a valuable talent. It helps to have a partner who is sociable and even loquacious.

Between Dave and I we are capable of a steady stream of useless but entertaining conversation. We meandered between reminiscence of past days working together at Westport Shipyards, women, the relative virtues of power vs. sail and sail vs. power, women, oars, Caleb who is now in Kentucky, and how long the current stock of resin would last. Religion, politics and the longevity of string theory as a viable cosmological theory were absent and not missed.

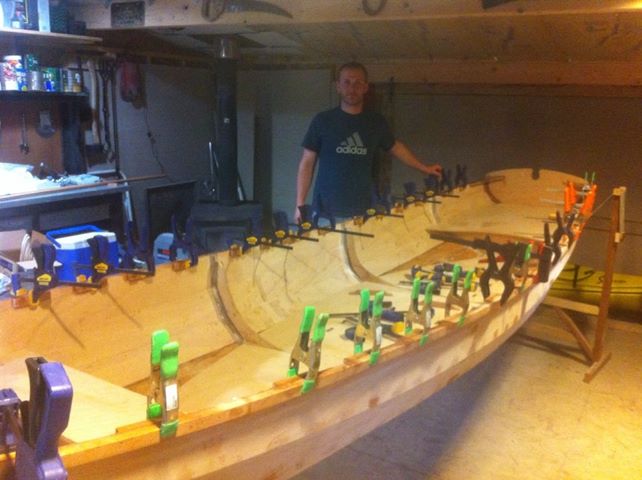
Having spent 30 years living with a fourth grade school teacher I am very familiar with the concept that, “busy hands are happy hands.” The time passed in spite of ourselves and we moved on to sealing the remainder of the planking which is not covered in fiberglass cloth. This is the part where the whole epoxy saturation technique comes by it’s popularity. The method takes mere marine grade plywood and turns it into a tough abrasion resistant material that is as waterproof as you can expect wood fiber to get. We mixed up a preliminary batch of MAS epoxy without adding any thickeners. Rolling it on went well. It’s surprising how far a small amount will go.  Okoume plywood is thirsty stuff. Some people like to varnish a hull after this stage. The epoxy is not resistant to ultraviolet rays. Paint does the same job cheaper and with fewer coats. Besides, I have never been partial to the look of  bright finished okoume. it just seems to remind my old-school sensibilities that we don’t see much genuine Honduras mahogany these days.

Since this post was written Dave has been busy getting enough done on the boat to do an early launch of the Chester Yawl. That will hopefully be done this weekend. Dave is getting ready to move to California to pursue studies for the ministry at a Bible college. Seems everybody is leaving here lately. First Caleb, now Dave. I’ve enjoyed their companionship and good humor. It has elevated this project to something greater than simply following instructions in a neatly assembled kit. When people come together to build objects they also build community. The bonds we forge display the true value of our skills.

 
Posted in Building | Tagged , , , | Leave a comment

The 37th Annual Wooden Boat Festival Has A Lot To Offer

Where else can you see this many great wooden boats old and new than at the annual Wooden Boat festival in Port Townsend, Washington. This is the place to be for west coast fans of everything in boating that is not made of fiberglass. It all seems particularly apropos here in the Pacific Northwest with it’s rich tradition of lumbering. Having worked in a plywood mill I know how deep the roots of the lumber trade go. Standard fare in humor was the barbecuing of the Spotted Owl. Forest products of all kinds once formed the primary source of employment in western Washington..

Among the things I will be concentrating on this year will be Chesapeake Light Craft. I don’t believe they will have a Chester Yawl at the show. It will be interesting to look at the rest of their line in depth having some experience of building one of their kits. I hope to get some time on the water in some CLC boats.  My impressions will be featured in Seaward Adventures.

There will be a number of seminars to attend. Probably more than I can actually get to not having mastered the art of being in two places at once. Items of special interest are:A Bob Perry Daysailor: Sliver, Build Your First Wooden Boat! by Dan Mattson, fillets and Bonding with Bruce Blatchley, and Scudding, a book written by Julia and George Maynard about building and cruising in a Spray replica.

Of course Sunday will be pirate day for me and my grandson. It’s an annual bonding ritual that gives me many fond memories which I shall revisit in my dotage. My grandson will have the same opportunity someday in therapy as Grandpa is a bit weird.

There will be more to see and do than I will have time for. That’s the beauty of it. You simply can’t have too many wooden boats all in one place.


Posted in Events, Uncategorized | Tagged , , , , , | Leave a comment

Details and Thinking Outside The Box The Kit Came In: Chester Yawl Part 4

A boatbuilding project breaks down into many tasks varying in importance. Smaller components are completed and brought together with other sub-assemblies so that the sum of the parts will create something like the whole. One reaches a point where all the big chunks stuck together have become something that looks exactly like a boat even to the uninitiated. This is where the devil walks in and boldly displays his list of details. The Chester Yawl has reached that point. Dave and another friend, Bob Eastman, have been working on a variety of mundane tasks. Much time was dedicated to fiberglass on the bottom and stem area, filling the hundreds of small holes left by the stitch and glue process, and the interminable sanding that is a necessary part of woodworking.

I made a working visit to help with setting the stern seat and forward deck in place and applying the epoxy fillets. There is a bulkhead under the forward edge of the stern seat as this area is meant to be a closed space. A fitting was included that provides a sort of ventilation plug for the area. It required drilling a one inch hole in the bulkhead for installation. As it happens there was not a suitable hole saw in the shop to care of this. After working on the filleting for awhile we went to the local Walmart to see about buying an appropriate hole saw or paddle bit. As luck would have it hole saws came only as a large and expensive package and the individual paddle bits came in three sizes with the one inch size being sold out.

Thinking, if not entirely outside the box but rather peeking out from the slightly lifted lid, it occurred to us that the job might be done with a jigsaw. Back at the shop we prepared to drill an entry hole for the saw blade and further refined the process with the idea that we needed only drill a series of small holes around the circle, punch out the waste and sand the edge of the hole smooth. Such is the evolution of an idea that was ultimately successful although we did waste a little gas and time in the process.

The forward deck on the yawl is one of several modifications to the original design that Dave has made on this boat. He was not happy with the large platform-like bow deck on this boat and so decided to reduce it too a small vestigial deck extending less than a foot aft of the stem. There is now also a thwart style seat where the after edge of the seat was originally placed. The effect is a much more open bow area. By retaining the seat and the stretchers that support it there will be adequate strength to the forward portion of the hull.

Another major change was the addition of an inwale to create a classic open gunwale. It took a bit of thinking to work out a pleasing arrangement of spaces in relation to the frames and the oarlock blocks. About twenty small spacer blocks were made for each side of the boat. The inwale was sprung in place with the spacers in between inner and outer rails. Dave and Caleb glued up the assembly in fine style. This method will make for a very rigid hull.

On my last visit to the boat shed Dave and I hand sanded round-overs on inner and outer rails. We also relieved the hard edges in all the rectangular holes between the rails and spacer blocks. These rails will eventually be varnished. Varnish does not love a sharp edge but rather loses itself to chafe. The subsequent bare wood takes up moisture and soon causes problems. The work though tedious is necessary if one’s craft is to remain in Bristol fashion.

So a little bit has been taken away and a little bit added back on.  We will see on launching if  trim has been adversely affected. One of the beauties of small craft is that trim is such a fluid proposition that often we can adjust it by slight changes in rowing position or simply moving the cooler or tackle box. I wouldn’t suggest to anyone that they should make significant changes to a design or a kit. It is in the nature of guys with tools that they will act independently. My disclaimer offered to you for what it’s worth concerning modifications is don’t do it. If you are going to anyway consider everything carefully. Become familiar with traditional methods before trying out new ones, don’t hurt yourself and be sure to have fun.

This post was finished later than I had wanted. Life-stuff has been getting in the way lately. I hope to get on with more of this kit build coverage soon. The Wooden Boat Festival in Port Townsend is coming up in a few weeks. I will be chatting with John Harris of Chesapeake Light Craft and hope to have some interesting observations. If they have a Chester Yawl with them I should be able to get a chance to row it. I will have something to say about that. Probably something along the lines of, “I gotta get me one of these!”

 
Posted in Building, Sailor's crafts | Leave a comment

The Boat Guy Talks Up Pelicans, Cool Video

Little surprises crop up on my Facebook page. The good ones are not trying to seduce me into buying useless stuff. The best ones have actual nautical content that speaks directly to my soul. Today’s serendipity was a posting from Chip Hanauer’s The Boat Guy website. It specifically talked about a video blog post in which he talked about San Francisco Pelicans. I do love me a good Pelican and often wax nostalgic about the Pelican in my past, Old Time Song.

mailedD9

Not being a native Pacific Northwesterner I had not heard of Chip before. Turns out he is a retired championship hydroplane racer. This just makes his story that much cooler. It’s like an F-16 pilot ratcheting his flight regime down to Piper Cubs. Just as the Cub distills flying down to an activity that is accessible and promotes a sense of easily relatable experience the Pelican brings sailors together in community around their vessels.

The 12 foot San Francisco Pelican packs a lot of security into it’s short length. The cockpit is deep and wide. Although the flare of the sides makes her initially tender the reserve buoyancy that builds quickly as the boat heels makes her as solid as a rock. My Pelican never capsized and I always felt very safe on that score. While sailing with a cap full of windand one of my more daring (read freaking crazy) friends we made an effort to get her over. This was on a lake where we knew the shore was in safe swimming distance. We couldn’t do it. By the time we had water washing over the rail she was as stable as a cement foundation.

There were times when I wished the boat was better in light winds. I never got around to mounting a small outboard on the transom but she always got me home. Only occasionally did she make me break out the horribly inefficient paddle I kept under the forepeak. The Pelican is a good little boat for trailering. Mine tracked well and behaved itself on the launching ramps. Set up time was fairly quick and was only delayed by the curiosity seekers attracted by her unusual look. As a Pelican owner you quickly develop a set patter that moves the conversation on quickly.

Check out The Boat Guy. You will enjoy the video. It’s professionally produced and very entertaining.  The fact that the Puget Sound is home to quite a few Pelicans makes me feel a little more at home.

a 002


Posted in Podcasts, Sailor's crafts | Tagged , , , , , , , , , , , , , , | Leave a comment

Congratulations to Hooked On Wooden Boats 100th Podcast

I have followed Dan Mattson’s podcast, Hooked On Wooden Boats, since the very first episode. Podcasts come and go and I have a high appreciation for the ones that endure. It is disappointing to see them fade, especially when I’ve gotten addicted to one that speaks to my own passions.  HOWB is among my favorites because of the quality content brought to it by a host who manages to search out and interview precisely the kind of people who’s head I want to peek into.

One hundred episodes is a marvelous achievement and a testimony to the motivation of the host. This episode features interviews with 8 year old Henry LePage who built his own eleven foot skiff and Cliff Ravenscraft, “The Podcast Answer Man.” Mr. Ravenscraft’s online course in podcasting gave Dan Mattson the tools to start his own podcast.  HOWB has come a long way in terms of production values but part of it’s charm has been the personal touch of  a host that does not sound like the eleven o’clock news or an advertisement for the latest pharmaceutical wonder. Many of his interviews are done at boat shows with background noise and interruptions appropriate to the setting.

Dan has never cast himself as an expert and can be seen to learn along with the listener the nuances of designing, building, restoring and generally messing about in boats. Episode one of Hooked On Wooden Boats was posted on September 22, 2011. Since then Dan has interviewed a diverse array of personalities in the wooden boat world, most of them from the Pacific Northwest. He is starting to branch out with interviewees from across the country which promises to be an asset to the shows already excellent content. Dan has taken the experience he has gained with HOWB and from building his recently launched stitch and glue canoe to write an electronic book.  Get in The Wooden Boat Game is a guide for the interested amateur in selecting the right boat to build first time out.

My just finished canoe "Chelan" on the Columbia River.  Photo by Wooden Boat Dan

Just finished canoe “Chelan” on the Columbia River. Photo by Wooden Boat Dan

Dan is currently building an eleven foot John Welsford designed Scamp. He will be bringing it to this years Wooden Boat Festival, September 6-8, in Port Townsend, Washington where he will also be presenting a talk on building your first boat. Congratulations Dan, I am sure we will be saluting you again when episode 200 comes in view.

 
Posted in Building, Events, Podcasts, Sailor's crafts | Tagged , , , , , , , , , , , | 1 Comment

As the Arrow Flies: Chester Yawl Part 3

A boat is a roundish sort of thing. Round is not an ideal hydrodynamic shape. Push it through the water and it will tend to wander, much like my prose, unless something is added to set things straight. The pull of oars is generally symmetrical but unless you are very good and well practiced your rowboat will respond to the inconsistencies in your stroke. You will constantly be making corrective moves that waste a lot of energy. Sometime after the first primitive boatbuilders decided to hollow out a log, instead of merely sitting astride, measures were taken to bring directional stability to meandering watercraft.

Boats built with a long deep keel have the solution built in. those that are shallow with uninterrupted bottoms require the addition of some appendage to bite into the medium through which it travels and provide resistance to turning moments. Like the feathers on an arrow a skeg gives the lateral resistance needed to create a straight track and a means by which the average Joe can cross great waters with efficiency and a sense of purpose. The skeg on some craft is the aftermost portion of an external keel.

I was hanging about Dave’s boat shed one Saturday afternoon when the project du jour was the affixing of the skeg to the Chester Yawl. Like many small plywood boats the Yawl does not have a structural keel. The bottom planks are reinforced with layers of fiberglass and epoxy on the inside and outside. The plywood skeg is attached along the center-line of the boat. It is about four feet long and runs from the transom forward until it tapers in a fair line with the rockered profile of the bottom of the hull. It’s bottom edge is capped  with a wear strip made from Spanish Cedar.

The bottom planking comes together at an angle forming a ridge. By way of preparation for receiving the skeg the keel area needed to be planed and sanded down a bit to provide a flat landing area along the aftermost portion of the keel area. Dave applied a longboard with 80 grit sandpaper to the appropriate area. This effort was made keeping a  profile that would match the curve of the skeg. It was a hand and and eye move with frequent trial fittings.

The installation of this part is neither rocket science or precision woodworking. Dave drilled the three required holes through the bottom of the boat along the centerline. The drill was run through the same holes again with the skeg in place  to make pilot holes.We mixed up some thickened epoxy, mayonnaise consistency, and applied it to the mating surfaces of skeg and boat bottom. The skeg thus slathered was placed in position and screws were driven in from below.  As excess epoxy squeezed out along the the joint we filleted it to make a neat transition. Later on fiberglass would be applied making a strong and useful appendage which will do much to make the Chester Yawl fly along her course, straight and true.

 
Posted in Building, Sailor's crafts | Tagged , , , , , , | Leave a comment

The Sheer Beauty of a Fair Rail: Chester Yawl Part 2

In which the boys in the boatshed live on the edge before being run out of town on a  rail.

Chester 4

ON FAIRNESS

I like to run my eye along a beautiful curve. When a line sweeps along a contour with a flowing motion it creates a sense of rightness that is part mathematics and fully sensual.  Great boats are given shape through the discerning eye of a designer who can mold the symmetry of a hull to the fluid motion of  the dynamic medium of water. Abrupt changes, wobbles and humps are an interruption in the form that follows the function of a seaworthy craft.  A boat’s “sheer” is the line where hull meets deck, often delineated by the gunwale or rub rail. In boatbuilding we call that even undisturbed curve, “fair.” Getting it right is crucial and a point of pride for anyone who turns their hand to the craft of boatbuilding.

The Chester Yawl has a lovely  sheer. It is in my opinion just right. The lowest point comes a bit farther than two thirds of the way aft of the stem. It rises gradually toward both ends in a dramatic but restrained curve higher at bow than at the stern. The weekend after completing the epoxying of seams, Dave Eckler gathered Caleb and myself to attach the rub rails to his boat and achieve the delineation that may forever mark his craft as a jewel.

CLAMPS A LOT

 This job was much less time consuming than our previous task. Success depended on two things: our eyes and a large quantity of clamps. Between the tool collections of the three of us we managed to gather about 50 clamps of various sizes and types. I have a special fondness for clamps of all kinds and sizes. No matter what your wife, children, physicist uncle, or preferred spiritual authority says, it is simply impossible to have too many of them. Most of mine come from garage sales because I’m cheap and I enjoy the thrill of the hunt. I brought a generous contribution to the project.

So far Dave has managed to have an adequate supply of tools and materials on hand. The Spanish Cedar lumber for the rails arrived as the only broken parts in the kit. Chesapeake Light Craft very quickly sent replacements. Each 15 foot rail comes in two parts with a pre-cut scarf joint. Dave had already glued the parts together on the previous day.

THE DRY FIT

As in most glue jobs our first task was to do a trial fitting. Each rail was screwed on to the hull at the bow through the planking into the breast hook. We then worked our way aft bending it into place and following the upper edge of the sheer plank. These planks are cut precisely on a CNC machine but we had also eyeballed the sheer to make sure they ran fair and mirrored each other from side to side. They did and we had little trouble positioning the rails. They were clamped on with just a few clamps at first. More were added as we worked to make sure the rail laid tight against the planking along it’s full length. The job goes best with two sets of hands. Of course once that was accomplished we congratulated ourselves and took the whole thing apart. Each clamp was laid on the floor adjacent to the position it would take up in the final glue-up.

BRINGING IT ALL TOGETHER

Rails such as these rely on adhesives in this day and age. Traditional construction would call for screws or rivets. The CLC manual frequently calls for epoxy thickened to mayonnaise consistency. It’s a sort of mantra with overtones of toxicity. Once again nitrile gloves were donned and the ritual of pumping and stirring began. Everybody grabbed a brush and began spreading epoxy goo on the backs of the rails. From there it was a simple matter of repeating what we had just done. There was a little extra fiddling with clamps as we settled the rails into place. At some places the curve flattened out a bit  and additional clamps were applied for more localized pressure. With both sheer lines bristling with clamps we each took turns at sighting along the curve from the bow. To do this we had to open the front door so we could get our heads into position even with the prow.

Chesapeake Light Craft’s design calls for a single strip of Spanish Cedar on the outside of the plank. Dave was of the opinion that an inwale would provide a stronger and stiffer boat. A discussion arose over the necessity and means of accomplishing this. It was fueled by bottles of cold ale that had made their appearance about the time we were able to shuck the rubber gloves. Dave settled on a slotted gunwale consisting of an inner rail spaced away from the hull planking by 4 1/2 inch long blocks of cedar. This was done on a subsequent occasion which I was not present at. The result looks very nautical and should in fact provide a sheer strong enough to slam against the side of a barge in a moderately strong chop.

Chester 8

Contours and edges are the elements that strike the eye and become food for some part of the brain that defines beauty and balance, symmetry and substance. There are measures of form and beauty born of subjectivity which through common agreement become worthy standards of judgement. So it is that we have the Golden Ratio, the ellipse, Venus De Milo, and roller coasters.

With the rails in place we reached a point of satisfaction. The boat’s shape is almost complete although there are many small details to come in the following weeks. There is a skeg to add, some fiberglass on the bottom and a lot of raw wood is showing. At this point the mind easily constructs an image of the finished craft . We imagine her afloat riding the water like a feather come to rest on a stream which may carry her far and wide. The promise of this picture tells us that even without paint the effect will be quite pleasing.

Chester 9

 
Posted in Building, Sailor's crafts, Uncategorized | Tagged , , , , , , , , , , , , | 3 Comments

Bonding With Boats, Beer and Epoxy

In the hierarchy of things that constitute “simply messing about in boats” sailing is at the head of the list. Next is time spent building, restoring, painting or in any way physically advancing a boat from land-bound to seaborne. Time spent in the boatyard or the shop has a quality that transcends common hours. The effect is enhanced when such activities include equal parts cold beer and friends.

A  friend of mine who used to work for the same employer as me is building a boat in a shop he built. It’s very different from the wide open spaces of an industrial park setting but it has a style and a spare utility that makes a fellow feel at home. Dave Eckler is a graduate of the Wooden Boat School in Port Hadlock, Washington. He is an east coast transplant like myself. Knowing that I am a sucker for a pretty hull form and a dab hand at pretending to be competent at all things maritime he requested my assistance at various stages of his building project. Joining us was Caleb Stott, another coworker, who drifted into the local super yacht industry with a fine woodworking skill set and a discerning palate for today’s micro-brews. The beers that cemented our working relationship were a stalwart Alaskan Amber and the cased assortment from the New Belgium Brewing Company.

The finished chester Yawl will look like this little beauty. (photo by permission of Chesapeake Light Craft, LLC.)

The finished Chester Yawl will look like this little beauty. (photo by permission of Chesapeake Light Craft, LLC.)

The boat that brought us together is a kit from Chesapeake Light Craft, their Chester Yawl row boat design.  It is an adaptation of the classic whitehall design translated into modern marine grade plywood.  The old school cedar planks and copper rivets are replaced with a construction method called lapstitch. This consists of planks which join each other along overlapping edges. The bottom edge of each okoume plywood plank has a rabbet which provides alignment, and once epoxied together, a great deal of strength.  Planks are assembled and held together by copper wires that pass through adjoining holes in the plank edges. The wire ends are twisted together to draw everything together tightly. At the end of all this one has an upside down hull presenting approximately 180 linear feet of bare seam which must be cemented together into a unified structure. One of the most time consuming parts of the project is running beads of thickened epoxy along each plank lap to bond them all together. Our team provided the needed solidity by applying God’s gift to inorganic chemistry with a bit of filler to make it, as they say in tech journals, less runny and more gloppy.

Epoxy loves a bit of heat to cure and come to the proper hardness. Port Angeles has a moderate climate and Dave’s home and shop are in a wooded area that assured lower temperatures than would be best for curing epoxy. The wood stove had been going long before I arrived. This brought the shop up to 80 degrees for the duration of the job. A cooler just outside the shop door provided the cold comfort needed to bring everyone back to efficient operating temperature.

Having the boat on a low stand gave easy access to the ten rows of seams each of which needed to be filled and filleted. We Donned nitrile rubber gloves and mixed small batches of MAS epoxy in plastic cups. MAS makes the metering of the material easy as their pumps dispense the epoxy in doses such that an equal number of pumps for both resin and hardener will give the proper mix. We added enough silica filler to bring the batch to a mayonnaise sort of consistency. The epoxy mix was then scraped, shoveled, oozed and generally coerced into a plastic zip lock bag with a corner cut off. Thus armed one feels less like a boat builder and more like a cake decorator.

Applying the glue requires a steady hand and some basic restraint. It would be easy to make a real mess of the job. We took our time and did our best to make a careful job of it. One needs to remember that excess epoxy not removed at this stage will need to be sanded off later. That way lies madness and carpal tunnel syndrome. We kept rags and denatured alcohol handy for cleanup. It’s best to skip applying glue where the thousand and one twisted wires cross the plank laps. We did not follow this rule very well and that gave Dave a little more work to do later. Working alone this job would have occupied six or eight hours of an unpracticed workers time. We did it in about two hours.

There is satisfaction in a job well done. It is equaled by a mixture of conversation and common labor that traces the connections between diverse individuals who appreciate honest opinions leavened by large doses of good humor. It surely made the effort worthwhile and lent it’s own measure of quality to the project. As important as the joining of wooden parts is the meeting of minds and the bonding of our better natures.

 
Posted in Building, Sailor's crafts, Uncategorized | Tagged , , , , , , , , , , , , , , , , , | Leave a comment

A New Rudder Takes Shape in the Shop

Every ship needs a steady hand on the helm. A stout tiller to grip through which the pressure of water in motion can be felt is the interface between the sailor and his medium. Unfortunately my 17 foot daysailer does not currently have a helm. The rudder and tiller that came with it was a sad affair made from a scrap of exterior plywood on the cusp of delamination. The tiller was a piece of rough carpentry that was sawed out of a chunk of two by six. The hardware that graced this uncertain device had been beaten into a shape wholly inappropriate for it’s intended use. Clearly a new rudder is needed and I have been applying my skills to that end.

A little research on the internet yielded a drawing of the official class specifications for a flip-up rudder with an air foil blade. I reckon it’s within my skill range so I have started the process. Being the cheap old sailor that I am the new build features scraps of good quality materials. The new rudder will be made from Okoume BS1088 ply with a teak tiller. None of the parts involved are very large so the design lends itself to recycling cutoffs and discards from your own or some other craftsman’s shop. I have various article’s of sailboat hardware gleaned from flea markets and garage sales but no rudder hardware. New pintles came in the mail from D&R Marine several days ago. They look like good solid units and were reasonably priced. D&R carries all the necessary hardware for O’day sailboats. Sometimes you just have to pay retail.

When I have a chance I will put together some video on the project. My time for personal projects is a little limited now a days but I hope to continue making steady progress. In the mean time I am looking forward to the Shipwrights Regatta in Port Townsend. Washington on February 23. I will be hitching a ride as crew on one of the many interesting classic sailboats. I don’t know which one yet. Fortune will be my guide and the hand that steers my course.


Posted in Events, Sailor's crafts, Uncategorized | Tagged , , , , | Leave a comment

It All Hinges On Raising The Mast

Last August I purchased a 19 foot O’day Daysailer that is in fundamentally good shape but needed a few replacement parts and some attention paid to several old ones.  I had hopes of getting out on the water this spring but the vicissitudes of life get in the way whether you even know what a vicissitude is or not. One thing I do know is that it is not smart to trust your life and that of loved ones to the whim of the wind and waves before you are prepared.

The boat came with a plywood creation that in it’s better days was not worthy of being called a rudder. More on that at a later time. Life has opened up some small segments of sort of free time. It being an actual sailboat will require me to sew some patches on the sails and reattach the jib sheet turning block tracks to the wooden coamings. First I will talk about how I intentionally sawed my mast in two pieces.

This boat has a 24 foot 7 inches long aluminum mast that needs to be hoisted to a vertical position and dropped into a hole on the cabin top then lowered onto a rotating screw jack mast step. This is not a huge problem for healthy young men who are eager to run around the buoys in a desperate bid for low speed excitement. Sixty will soon tick off on the calendar of my life. There has been some wear and tear on both my body and my attitude. Enough so that I don’t want to screw up my back or drop anything in a way that adds more repairs to an already strained to do list. The problem is solved with a simple fitting that hinges the mast at a point just above deck level.

The job is not difficult although it gives one pause to contemplate sawing through a mast. It is the central structural element of the boats aerodynamic power plant, the large bone to which her feathers are attached.  It compares to an airplane’s wing which is formed of ribs and skin wrapped around a main “spar.” A sailor or pilot likes these elements to be strong and enduring. It has often been said that a dismasting at sea can ruin your whole day.

The tools needed are a hacksaw, drill, file, tap and a screwdriver.  I obtained the actual hinged mast fitting from D&R Marine who handles most anything you need to replace on various models of O’day sailboats. It came with the proper stainless steel screws and directions. Anyone finding themselves with a similar task may do well to remember the following points. Be sure to make your cut as square as possible. You will actually be making two cuts as you are removing a section of the mast about two inches wide so that the finished length of the mast doesn’t change. if it’s been a long time since you used a tap to thread a hole by hand this section is handy for practice.

Once the mast sections have been cut clean up the burrs made by the saw blade with some sandpaper or emery cloth. The fittings that slip into the mast are aluminum castings which will probably be a bit too large to just slide into place. Chuck them in a vise and use a flat file to remove just enough aluminum to provide a close fit. the fitting has removable pins fore and aft so that it is easy to separate the upper and lower halves for inserting in the mast extrusion.

If you are working with a different make and model of boat there will be some differences in the design so just use good judgement. think the process through and don’t ignore any printed directions that come with the parts.  When the job was done I was able to raise my mast solo although I am still planning to work out an A-frame and tackle system to make it even easier and to keep the mast better aligned as it is erected. Before it reaches the vertical where the stays can effectively limit sideways movement a crosswind can prove troublesome.

I am including a video to show the basics of what I did. I hope it provides encouragement for anyone needing to make similar modifications to their rig. In a future post I will do the same for my new rudder build.


Posted in Sailor's crafts, Uncategorized | Tagged , , , , , , , , | Leave a comment